使用 Github Actions 自动部署 Hugo 到仓库和服务器
为了不在本地电脑上折腾 Hugo,而且本地的 git 也总是出故障,能力有限暂时处理不了。所以打算用 Github Actions 自动部署到腾讯云的服务器,同时也可以部署一份到 Github Pages 作为备份。这样就能实现我在本地使用任意的 markdown 编辑器写完笔记,将 md 文件上传到 Github 后,就不用管了~
为了不在本地电脑上折腾 Hugo,而且本地的 git 也总是出故障,能力有限暂时处理不了。
所以打算用 Github Actions 自动部署到腾讯云的服务器,同时也可以部署一份到 Github Pages 作为备份。
这样就能实现我在本地使用任意的 markdown 编辑器写完笔记,将 md 文件上传到 Github 后,就不用管了~
准备工作
- 新建 Github 仓库
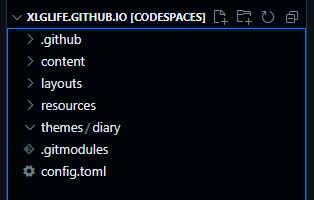
xlglife.github.io(请自行修改为自己的信息) - 创建一个 Github 的
codespace(在线的 VScode,本地 git 坏了没法用) - 终端运行
git submodule add https://github.com/AmazingRise/hugo-theme-diary.git themes/diary安装主题 (以diary主题为例) - 从 这里 下载
exampleSite文件覆盖根目录
这样 Hugo 程序的源文件就上传好了

部署到 Github Pages
- 首先在 这里 生成一个 Github Token(repo 权限)
- 在仓库的
Settings→Secrets and variables→Actions中添加一个Secret- Name 填入
ACTION_ACCESS_TOKEN - Secret 填入刚才生成的 Token
- Name 填入
- 在仓库的
Settings→Pages→Build and deployment里选择- Source 选择
Deploy from a branch - Branch 选择
gh-pages - 记得勾选下面的
Enforce HTTPS
- Source 选择
- 最后一步,在仓库根目录下创建文件
.github/workflows/Deploy.yml,内容写入:
|
|
保存提交,然后等待部署完成后,就可以访问 https://xlglife.github.io 看看了
部署到服务器
- ssh 登录到服务器,输入命令
ssh-keygen -t rsa -b 4096 -C "your_email@example.com"(改成自己的邮箱) - 一路默认回车后,就可以在
~/.ssh目录下看到id_rsa(私钥)和id_rsa.pub(公钥) - 首先将公钥里的内容,复制到
~/.ssh/authorized_keys文件中 - 然后回到 Github 仓库,添加如下
SecretSERVER_PATH,服务器上存储静态资源的路径SERVER_HOST,服务器 IP 地址SERVER_PORT,服务器 ssh 端口,一般为 22SERVER_USER,服务器 ssh 用户SERVER_KEY,前面生成的私钥内容填入这里
- 在
.github/workflows/Deploy.yml后面补充:
|
|
再次保存提交,等待部署完成,就可以访问服务器上的网址了 https://xlg.life
补充说明
其实部署到 Github 仓库和服务器,主要是最后一步的 Deploy 不同,我看来很多人写的不同的 Actions 命令,基本上部署到 Github Pages 都是用的 peaceiris/actions-gh-pages,而部署到服务器的确是有很多种方法,在这里我也被 ssh key 这个坑阻挠了好久,最终找到了 burnett01/rsync-deployments 才搞定。
参考资料
- GitHub - actions/checkout: Action for checking out a repo
- GitHub - peaceiris/actions-hugo: GitHub Actions for Hugo ⚡️ Setup Hugo quickly and build your site fast. Hugo extended, Hugo Modules, Linux (Ubuntu), macOS, and Windows are supported.
- GitHub - peaceiris/actions-gh-pages: GitHub Actions for GitHub Pages 🚀 Deploy static files and publish your site easily. Static-Site-Generators-friendly.
- GitHub - Burnett01/rsync-deployments: GitHub Action for deploying code via rsync over ssh
- 使用 git action 自动部署 blog
最后修改于 2024-07-02